How To Replace a Kitchen Sink Drain
Are your kitchen drain pipes leaking? Are you tired of that old drain assembly in the sink? Replacing a kitchen sink drain is inexpensive and relatively easy if you have a few basic tools and a little general home improvement knowledge. From disconnecting the drain pipes to replacing the sink drain strainer assembly, the steps explain how to replace a kitchen sink drain.
What Is a Kitchen Sink Drain?
A kitchen sink drain includes two main sections that allow wastewater to drain out of your sink. First is the sink drain or strainer assembly inside your sink. It is basically the drain hole inside your sink.
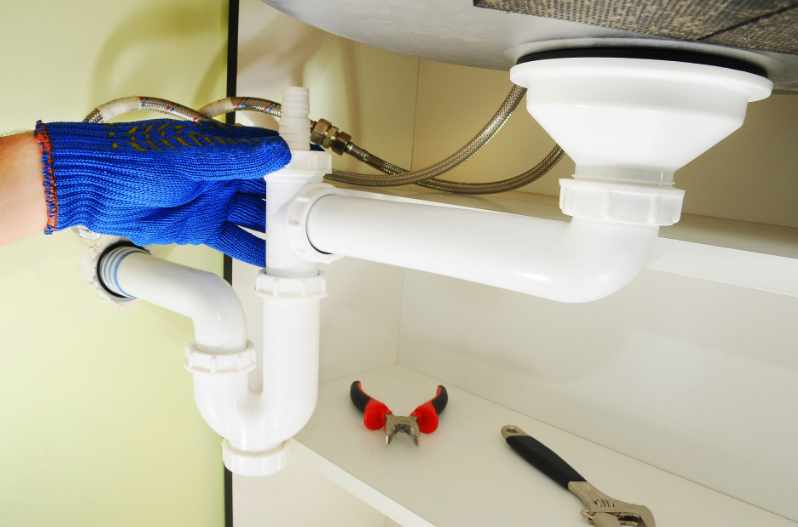
Then there are the sink drain pipes that are located below the sink. These include a tailpiece that connects to the strainer drain assembly, either an S- or P-trap, and then a discharge pipe that connects to your waste pipe.
Metal sink drains will usually last anywhere from 15 to 25 years or more. However, economy models may only last around 10 years. PVC drain pipes usually last about 20 years, but economy options may only last 5 to 10.
How Do You Replace a Kitchen Sink Drain Pipe?
Whether you only need to replace the kitchen sink drain pipes or want to replace the entire drain assembly, follow these basic steps. Review the instructions for your replacement parts and follow them for specific installation instructions.
1. Gather Tools & Supplies
Before you start replacing a kitchen sink drain, you need to gather the following tools and supplies. If you are only replacing the drain pipes, you might not need any tools at all. Most PVC drain pipes include hand-adjustable connections. However, an adjustable wrench makes loosening old pipes easier.
If you are also replacing the sink drain strainer assembly, you will definitely need an adjustable wrench. Other tools and supplies include plumbers putty, Telfon tread tape. In some cases, you might need a flat or slotted screwdriver and a hammer to help loosen the nut around drain assembly.
However, replacement sink drain parts do vary. Read the instructions for your replacement sink drain parts for any other specific tools or supplies you need.
2. Shut Off the Water and Clear Out Under the Sink
Turn off the water supply valves under the sink, then open the hot and cold faucets to drain the water lines. Wait until they stop flowing completely. If you do not have shut-off valves under the sink, turn off the main water supply to the house.
Although not absolutely necessary, turning off the water will prevent any accidents while you replace the kitchen sink drain. If you choose to leave the water on, put a sign on the sink or cover the faucet handle with a plastic cup so no one accidentally uses the sink.
Then start emptying out the cabinet. This will not only give you room to work but prevent water from ruining anything inside if there is a leak.
3. Disasmeble the Drain Trap
Most modern sinks have a PVC drain trap that is easy to disassemble with just your hands. Place a bucket under the trap to catch the water inside. Then look for the threaded compression couplings on either side of the trap.
P-traps will have two compression couplings, one on either end. S-traps may have three couplings, one on either end and then another in the middle. Regardless of the style, loosen all the couplings and remove the trap entirely.
Although rare, some kitchen sink drain traps are made of metal. While removing them is basically the same, you will need an adjustable wrench to loosen the couplings.
4. Remove the Strainer Assembly
While the strainer assembly is part of the sink drain, you may not need to remove it. Most are made of metal or metal-coated plastics that last much longer than PVC drain pipes.
You are more likely to want to replace the drain assembly for cosmetic reasons than because it is worn out or leaky. Decide whether it is worth replacing the strainer before moving forward. If you do not want to replace it, you can skip to step 7 now.
If you choose to replace it, loosen the locknut. Depending on the style of the locknut, you might be able to do this by hand. More often than not, you will need to use an adjustable wrench.
In some cases, you can also loosen the nut with a flat or slotted screwdriver and a hammer. Place the flat edge of the screwdriver in the corner of the nut and gently tap it with the hammer. The nut will eventually loosen up.
After removing the nut completely, you can remove the entire assembly. Push upward, then pull it out of the sink. Clean the sink opening, removing any remaining plumbers putty.
5. Wrap the New Strainer Assembly in Plumbers Putty
If you are replacing the sink drain strainer assembly, wrap plumbers putty around the new fitting. Use more putty than you think you need to form a water-tight fit.
Roll out the putty into a log about 12 inches long and roughly an inch in diameter. Then wrap the putty around the strainer assembly, cutting away any excess.
Do not worry if it looks like there is too much putty, it will get squeezed out during installation.
6. Install the New Strainer Fitting
Press the strainer drain into the sink opening using gentle pressure. Slip the rubber gasket over the drain pipe, then thread on the locking nut from underneath. Slowly tighten the locking nut with your hand, checking frequently to make sure it is level in the sink.
Then use the adjustable wrench to tighten it down. Once the locking nut is tightly in place, remove any excess putty that squeezed out of the opening.
With a bucket underneath the strainer assembly, pour a cup of water down the drain to check for leaks and gaps. Unthread the locking nut and add more putty if necessary.
7. Measure and Cut the New Drain Pipes
Most kitchen sink replacement drain pipe fittings come in a package and are sold as a universal solution. While that means they will fit nearly all standard sink drains, you still may need to cut the pipes themselves to get them to fit.
Slip the discharge pipe into the waste line, then screw the drain tailpiece onto the strainer assembly. Then slip the trap in place, only loosely threading on the compression couplings.
Ideally, the discharge pipe and the tailpiece should be level and form a 90-degree angle at the trap. For the best, the discharge pipe should go two to three inches into the wastewater pipe.
If the drain pipes are uneven, angled, or incorrectly connected, water will not flow properly. Over time, this can lead to leaks or blockages.
If you need to make cuts, measure carefully and cut away less material than you think is needed. Reassemble the drain pipes and check if they are level. Repeat until they fit well.
8. Install the Drain Pipe Assembly
With the pipes properly cut, start by connecting the drain tailpiece to the sink strainer assembly. Follow the instructions for your drain pipe kit to correctly connect the compression coupling. Leave the coupling loose enough that you can slide it up and down without it falling off.
Then install the discharge pipe following the instructions for your kit. Again, leave the couplings loose enough that you can make adjustments as necessary when you install the trap.
With both pipes in place, start connecting the trap. Make adjustments to the tailpiece and discharge pipes to get a level fit.
Once everything is in place, hand-tighten the compression fittings. Avoid using a wrench, as it can actually break the compression fitting and cause it to leak.
They should be tight enough that they do not wiggle or move under gentle pressure but not too tight that they strain the drain pipes.
9. Test for Leaks and Turn the Water Back On
Lastly, place a bucket under the trap and pour a few cups of water down the drain. If water drips or leaks, check the compression couplings. Otherwise, turn the water back on and test for leaks again. Run the hot and cold water for a few minutes to make sure the fittings are well connected. Then you can replace the items under your sink.
How Much Does It Cost To Replace a Kitchen Sink Drain
In total, replacing a kitchen sink drain costs about $60 on average if you do the work yourself. However, it could range anywhere from $30 to $100 or more. Whereas a professional plumber will typically charge between $125 and $250.
On average, you will spend between $20 and $60 for a new kitchen sink strainer assembly. However, designer models can cost upwards of $300. Even economy models should last 10 to 15 years or more. Premium models can easily last longer than 25 years.
The average cost of a drain pipe assembly kit is between $10 and $25. The kits work great, but they tend to use thin PVC that only lasts 5 to 10 years.
While you can get higher-quality materials, they are usually sold separately. Individual PVC pieces will last up to 20 years and cost $10 to $15 per pipe.
If you choose to get the parts separately, remember to get rubber gaskets and slip nuts to create the compression coupling. These will usually cost $1 to $3 each.
While replacing a kitchen sink drain is an easy DIY home improvement, using a plumber has two main advantages. First, they guarantee hassle-free installation and a leak-free fit.
Second, they tend to use higher quality materials than the basic PVC kits provide. So while you are spending more, the materials will last much longer.