How Do You Install a Toilet?
Looking to replace that old or outdated toilet? Installing a new toilet is a relatively easy task that most homeowners can do in just a few hours. Whether you are a seasoned DIY-er or a beginner, the following steps explain how to install a new toilet.
How To Install a Toilet
Here are the steps to installing a toilet:
Drain Water From Your Existing Toilet
Assuming you are replacing an existing toilet, you need to remove that first. Start by turning off the water to your existing toilet.
Most bathrooms have a shutoff valve on the wall or floor behind the toilet. However, you may need to shut off the main water supply in your basement or utility closet.
With the water off, flush the toilet to drain the tank. Then use a towel or sponge to soak up the remaining water in the tank. Force any water remaining in the bowl down the drain with a plunger.
Place a towel under the toilet and use an adjustable wrench to disconnect the water supply line from the tank.
Remove Your Old Toilet
Start by removing the tank bolts. Reach into the tank and hold the bolds in place with a screwdriver. Then use an adjustable wrench to remove the nuts. While supporting the toilet tank, pull out the bolts. Then set the toilet tank aside.
Next, remove the old tank o-ring from the bowl. Then pop the covers off the floor bolts and lift out the toilet bowl. They usually come off with just a slight twist. If you cannot get the covers free, wedge a putty knife between the cover and the toilet. Then use a flat or slotted screwdriver to pry them off.
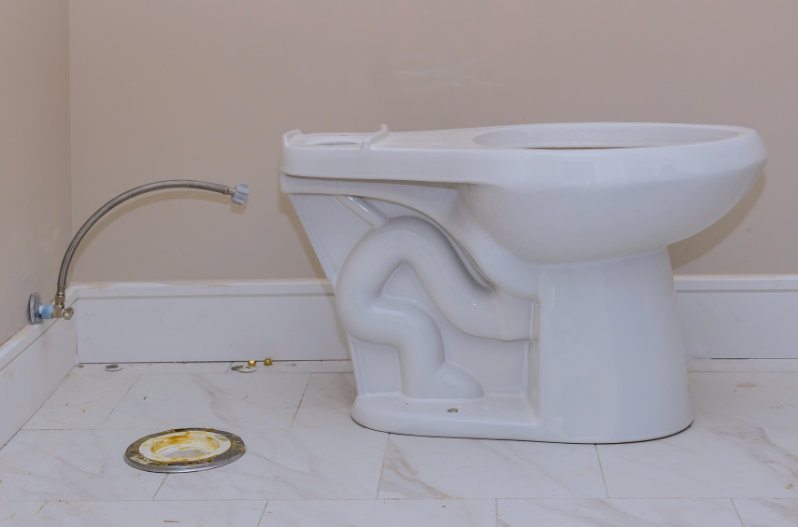
Use a utility knife to cut away the caulk around the floor. Then lift the toilet straight up and carefully move it out of the bathroom. Once you remove the toilet, stuff a rag into the wastewater pipe to block out sewer gases.
Remove the Old Seal and Flange
With the toilet removed, start by scraping away the remaining wax seal. Use a putty knife to cut the old seal away from the flange, then scrub the area with a stiff-bristle brush.
Then remove the old toilet flange. This is the fitting that secures the toilet to the floor and connects the toilet drain to the wastewater pipe.
Most flanges screw into the floor or even directly into the wastewater pipe. However, there are a number of different styles. Throw the old seal and flange away.
You can technically reuse the flange, but modern models are inexpensive and help prevent leaks. In most cases, it’s worth the $25 to ensure your new toilet does not leak.
Also, use a utility knife or razor blade to scrape any remaining caulk off of the floor.
Install a New Toilet Flange and Seal
Nearly all flanges are universal and easy to install. Simply press the flange into the waste pipe, then tighten the mounting screws. Follow the instructions for your model to properly install it around the wastewater pipe.
Then install a new seal. While wax seals are still available, a number of other materials are now available. Choose a seal that works with your new toilet and place it on the flange per the manufacturer’s directions.
Seat the New Toilet
Next, install the new toilet. Whether you are using a wax or non-wax seal, carefully place the toilet down.
The weight of the toilet crushes the seal, forming a water-tight seal between the bowl and the wastewater pipe. Line the toilet up and gently place it on the seal, making sure the flange bolts line up.
Then bolt the toilet bowl to the flange. Tighten down the bolts with your hand, then gently tighten them with a wrench. While they should be tight, avoid overtightening because it can crack the toilet.
Then install the toilet bolt covers and apply a bead of caulk around the toilet.
Connect the Tank and Water Supply
Install the tank o-ring seal in the bowl, then carefully place the tank in place. Bold the tank down using the mounting screws. Set the washers in place and feed the screws through the tank. Then tighten the screws. They should be tight, but overtightening can crack your toilet.
Most new toilets come with the flushing hardware pre-installed. However, you may need to install a new mechanism in some cases. Since the process can vary, follow the instructions for your specific model.
Then connect the water supply line to the fill valve at the bottom of the toilet tank.
Check for Leaks
Turn on the water and allow the tank to fill up. Check the water supply connection, the tank bolts, and the o-ring seal between the tank and the bowl for leaks. Tighten connections or bolts as necessary to stop water leaks.
Once the tank is full, flush the toilet to make sure it works properly. Check the floor around the toilet for leaks around the toilet seal.
Install the Toilet Seat
Lastly, install the toilet seat. The seat should not move when used, but be careful not to overtighten the screws. Most toilet seats use plastic screws and bolts that crack easily if they are too tight.